Part 1: Gather Your Supplies.
Before I began designing my custom CX-5 subwoofer box, I had to do some research. I came across a great article by Crutchfield that I referenced for general materials and construction techniques. I followed their instructions as much as possible, and will reference some of the instructions below. But I highly recommend checking out their article (link above) before you start building.
The first step here is to find out what materials to use in your subwoofer box. I leaned heavily on the Crutchfield article for this:
- 3/4" MDF (medium density fiberboard)
- 2" drywall screws
- 1/2" and 3/4" panhead sheetmetal screws
- Carpenters glue
- Silicon caulk
- Non-hardening rope caulk:
- 14 gauge speaker wire (red and black to keep it easy!)
- Speaker box carpet:
- Spray adhesive
- Staple gun (with staples)
- Subwoofer
- Speaker terminal cup
- I chose this terminal from Amazon, due to it's small dimensions that were required for my subwoofer box.
You will also need some tools for the build as well:
- Jigsaw
- Electric drill & bits
- Table saw (for angled cuts)
- Screwdriver
Got it? Good. Now it's time to design the box.
Part 2: Design Your Box.
Before I settled on my design, I had to pay close attention to two main things:
- I had to design a box that fit in the corner of my trunk, between the hatch and the wheel well.
- I had to make sure the internal volume of the box is at least 0.23 cubic feet.
I drew up the design for my box before I started cutting the first piece of MDF. I even made a cardboard template of the bottom of my box, and fit it in the corner, just to be sure it was a good fit.
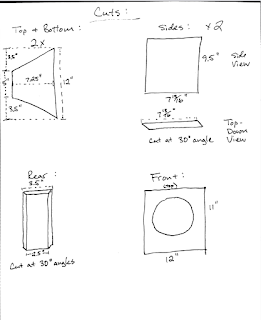
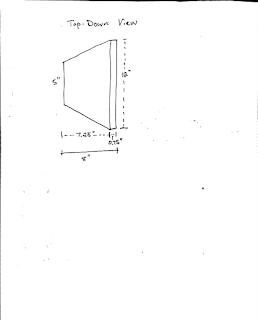
Here are the drawings and specs I used for my custom box:
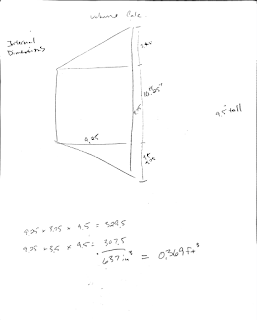
At this point, I knew I had a subwoofer box that would fit, but I needed to find out the internal volume. I calculated the internal volume at 0.369 cubic feet--perfect for my Rockford Fosgate subwoofer!
If you don't believe me, feel free to check out my calculations below:
Now it's time to get to work!
Part 3: Build Your Box.
Again, I highly recommend referencing Crutchfield's article during your build. I didn't take photos through the entire build, but I'll reference the steps below:
- Cut all of your MDF sides according to the specs above
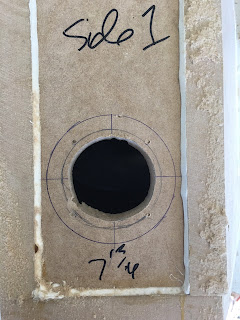
- The cutout diameter for the subwoofer I used is 7.13"
- The cutout diameter for the terminal is 2"
- Begin constructing the box:
- On a flat surface, screw the bottom of the front of the subwoofer to the bottom piece. Make sure to put a layer of carpenters glue on every part of the joining pieces, before screwing together!
- Screw the sides to the bottom piece and the front piece
- Screw the rear piece to the bottom and side pieces
- Screw the top piece to the front, rear, and side pieces.
Please note: your box has to be air tight! You must use carpenters glue between every connecting piece of MDF. This is what seals the box. The screws just hold it together!
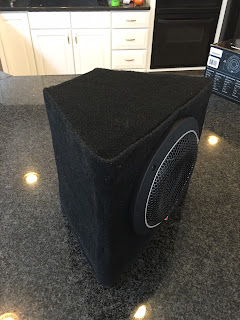
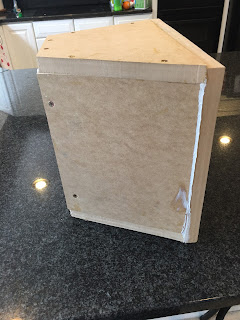
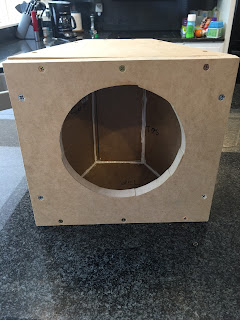
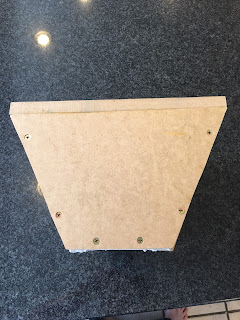
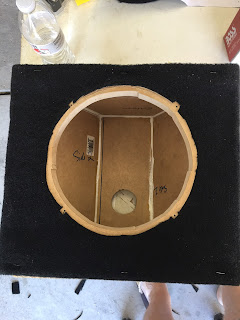
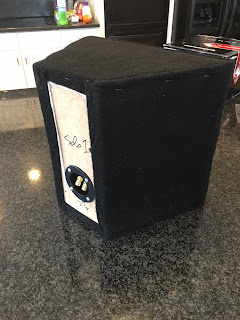
When all of the pieces are put together, you'll end up with something like this:
You may notice that I've also caulked the joints with silicon caulk after the wood glue dried. This is another recommendation from Crutchfield that I highly recommend doing. Keeping an air tight seal is vital when creating a custom subwoofer box.
Your next step (before installing the terminal cup and subwoofer) is to carpet the box. I found a roll of black automotive carpet on clearance at Walmart for only $5, so don't spend too much on this!
When cutting and wrapping the carpet around the box, take your time. You don't want to use too much carpet. Use spray adhesive along the flat sides. That way you only need to use a few staples around the edges. You'll also notice that I did not carpet into the subwoofer hole. You want to leave about a half inch space of exposed MDF board hear.
Next, I installed the terminal cup. Make sure to lay some more silicon caulk before drilling the terminal to the box.
Please note: when pre-drilling for using 1/2" screws, make sure not to drill all the way through the 3/4" MDF board! This may cause the box to lose its air-tightness.
Finally, it's time to wire the subwoofer to the terminal from the inside of the box. Use your 14 gauge red and black speaker wire for this. Once this is done, you can install the subwoofer speaker.
Before installing the speaker, use the non-hardening rope caulk around the opening, in the spot where we saved about a half inch of exposed MDF board. Make sure the rope caulk is in a complete circle, without leaving any gaps. Again, this is all about keeping the box air tight!
Once this is done, place the speaker in the hole, cover with the protective mesh woofer grill, and screw the unit down using your 3/4" screws.
Congratulations, your custom subwoofer box is now done! You're now ready to move on to Step 3: Installing the Custom Subwoofer in Your CX-5.


No comments:
Post a Comment