So your custom subwoofer box is built, but there's plenty more work to be done before you can crank up the music!
There are three things left to do before your subwoofer is ready play:
- Run power source to the amplifier
- Run audio source to the amplifier
- Connect the amplifier
What You Need:
First things first, you need to make sure you have everything you need to install your new subwoofer:
- Subwoofer in Completed Box
- Remember I used the Rockford Fosgate P1S2-8:
- Amplifier
- I used the Kenwood KAC-M3001 Compact Mono Digital Amplifier:
- 14 or 16 gauge speaker wire (red and black)
- 8 or 10 gauge power cable wire (red) with fuse.
- I used 10 gauge since I'm not using an overly powerful amplifier
- 8 or 10 gauge ground wire (black)
- 16 or 18 gauge blue "turn-on" wire.
- Large & small ring and spade terminals (matching your different wire gauges)
- Butt splice crimp connectors (various gauges); or connectors of your choice (i.e. heat shrink)
- RCA audio cable (25 feet)
- Line output converter
- I used the Scosche P90 Loc90 line out converter and I'm very happy with it. It comes with a wired remote that I love:
Finally, make sure you have the right tools for the job. Here's a list of some things you will want to have at your disposal:
- Screwdrivers (Philips and flathead)
- Socket set (with extension)
- Wire cutter
- Wire stripper
- Utility knife
- Electrical Tape
- Wire ties
Are you ready? Ok, let's wire this thing up!
Part 1: Running the Power Source to the Amplifier
The first thing you have to do is disconnect the positive and negative terminals from your car's battery, and remove the battery. You need to do this to gain access to the firewall, where you'll run your power cord.
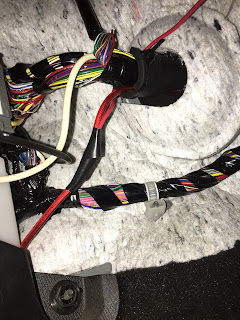
Run your red power cord through the firewall. Below is a photo where you can see the power cord coming through the firewall, into the driver's side to the left of the brake pedal:
Note: You may have noticed that I had spliced into my power cord right after passing through the firewall. This was to supply power to my line out converter, which I will cover later.
After running the power cord through the firewall, snake it behind the plastic paneling and run it under the plastic on the driver's side of the car, all the way into the trunk.
Once this is done, you may want to use your leftover silicon caulk to make a seal around where you cut through the firewall. Then you can reinstall your battery, but make sure not to connect the positive terminal! You want to keep the power disconnected the entire time your wiring your system.
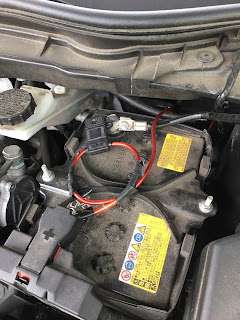
Make sure your fuse is located close to the battery terminal, not near the amplifier:
Next, you need to connect the power cord to your amplifier. Use a spade terminal connector for this. Then use the same type of spade terminal to connect your black ground wire to your amplifier.
There are plenty of good spots to ground your amplifier. The rear seats are bolted to the main frame. Using a ring terminal on your ground wire, loosen one of the screws. Make sure to use sandpaper to file off the paint and expose the metal before connecting the ring terminal and screwing down the bolt!
Once this is done, we have now connected our power wires. Just make sure to leave the positive terminal off the battery until everything is finished!
Part 2: Running the Audio Source to the Amplifier
There are a couple ways to do this. But I'm going to show you my way.
You will first need to remove the head unit to get to the wiring harness. While you're at it, remove the glove box as well. There are a few videos on YouTube that show you how it's done, but it's pretty easy. One tip: Make sure you have a socket extender! You'll need it to remove the head unit!
Once you remove the head unit and get to the wiring harness, you'll have to splice into the rear speaker wires, and connect these wires to your line output converter. You will have to splice into a total of four wires, highlighted below:
Please note: the wiring diagram above is for the 2014 CX-5 without Bose type audio. If you have the Bose system upgrade, make sure to find the appropriate wiring diagram, as it may differ from this.
The Scosche line output converter has wires to connect to the positive and negative left and right rear speaker wires. Just splice into the corresponding wires at the wire terminal with your 16 gauge speaker wire, and run the wiring behind the dashboard and through the glove box opening. From here, connect the corresponding wires to line output converter.
You will also need to connect a power wire, ground wire, and "turn on" wire to the Scosche line output converter. You can see above that I ran my power wire behind the dashboard and spliced into my main power cord running to my amplifier. As for the ground, you can see in the photo below that I used a spade terminal to ground to a bolt, attached to the frame. For the "turn on" wire, make sure leave yourself with plenty of length, because this wire will run along with your RCA cables all the way to the amplifier in the rear of the car.
I decided to place the line output converter inside the glove box well. I used Velcro to attach it to the sides. I used this spot because it's out of the way, but still easy to get to in case I want to adjust the settings:
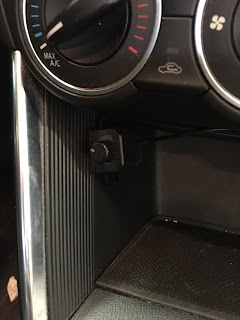
Since the Scosche line output converter comes with a mountable wired remote controller for adjusting the subwoofer levels (very handy!), I decided to mount this in the cubby hole by the cigarette lighter. There's a gap at the top, allowing you run the wire behind the dashboard. Using the double sided tape, I mounted the remote here, giving easy access to adjusting the subwoofer levels while driving.
Last, connect the RCA cables to the line output converter, and run these (along with your "turn on" wire) along the passenger side of the car, to the trunk. Do not run these wires along the same side of the car as your power cable! This can cause interference in the signal.
Please note: The Scosche line output converter has a cool function that will send a "turn on" signal to your amplifier if it senses input coming from the speaker wires. This means you don't need to connect your "turn on" wire from your amplifier to your antenna power output! This makes things much simpler and easier to install.
Part 3: Connect the Amplifier
Now that you've ran all your wiring to the rear of your Mazda CX-5, it's time to connect the amplifier.
You will need to connect the power (red) and ground (black) cords if you haven't done so already. Again, make sure the terminals are disconnected from the battery until you're completely finished!
Plug the RCA cords in the corresponding inputs on the amplifier. Using a spade terminal connector, connect the blue "turn on" wire to the "P.CON" input on the amplifier.
Finally, using the adaptor that comes with the amplifier, plug this into the amplifier's speaker output. Then splice your 14 gauge speaker wires to the adaptor wires, and connect these to the appropriate inputs on the terminal at the rear of the subwoofer box.
At this point, if you haven't done so already, use 1/2" screws to attached the amplifier to the top of the subwoofer box. Of course, you could place the amplifier anywhere in your vehicle, but this seemed to make the most sense to me.
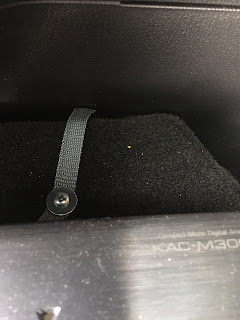
Finally, I drilled a small hole into the plastic behind the subwoofer box, and attached a strap to secure the subwoofer. I highly recommend doing the same, because you don't want your subwoofer taking a tumble in your trunk when you make a hard turn!
Now that everything's wired up, the only thing left to do is reconnect the terminals to your battery. Now you're ready to test out the sound, and set your equalizer settings!


No comments:
Post a Comment